The Easiest False Eyelashes for Beginners
Velour Plant Fiber Kit with Mini Glue and Go
I admit that I’ve never been good at applying false eyelashes. I always make a mess with the glue. Even if I get the lashes on one eye just right, I tend to ruin the look when I get to the other side.
It’s been a goal of mine to get better at applying false lashes for a while, but I never seem to have the time to practice. However, I recently discovered a lash product that has been a game changer for me.
The product is Velour Glue & Go Pen ($15). It’s the easiest lash solution for those of us who get frustrated and discouraged when it comes to putting on false lashes. And I’ve tried A LOT of lash products!
I like this product because it’s a pen with a clear glue formula that you can use to line your eye just like an eyeliner. Unlike magnetic lash liner, the lining doesn’t have to be perfect since it’s clear.
The pen has a precision tip so you can easily get in the corners. It also dries fast so you can attach your lashes pretty much immediately. Velour’s lashes just stick right onto the liner. They are very light and go right on without much fuss or effort.

Here’s what the lash line looks like when Butterfly Effect Plant Fibre Lash is applied with Glue and Go. I only added eyeliner to the corners.
I’m a fan of the Plant Fiber Lash Kit with Butterfly Effect Plant Fibre Lash + Mini Glue & Go. It looks very natural and feels weightless. I keep the pen in my purse just in case I need a touch up. It’s just easy and convenient.
In addition to this kit, Velour offers a variety of other lash products and solutions for achieving everything from dramatic lash looks to DIY lash extensions. I spoke to Sophia Drozdowska, Velour Beauty’s Director of Marketing and Taylor Murphy, Velour Beauty’s Education & Content Manager to get all the details on how to pick out the perfect false lashes for your needs.
Everything You Need to Know to Pick Out the Best False Eyelashes for You
Which lashes are the best for beginners?
The Effortless Lash collection is best for beginners, because they’re pre-trimmed so you don’t need to worry about measuring or trimming! Understated is one of our best-selling styles - it has the most natural volume so it’s a perfect first lash.
Which one looks the most natural?
Our Velour-Xtensions™ Lash Clusters are the most natural-looking as they come on segments with a clear band. There are three styles within the collection, with Classic being the most natural.
Which style is the most dramatic?
The Vegan Luxe collection has our most dramatic lash styles so they’re perfect for a special event! Can’t Be Tamed and Serendipity styles are both very glam and customer favorites.
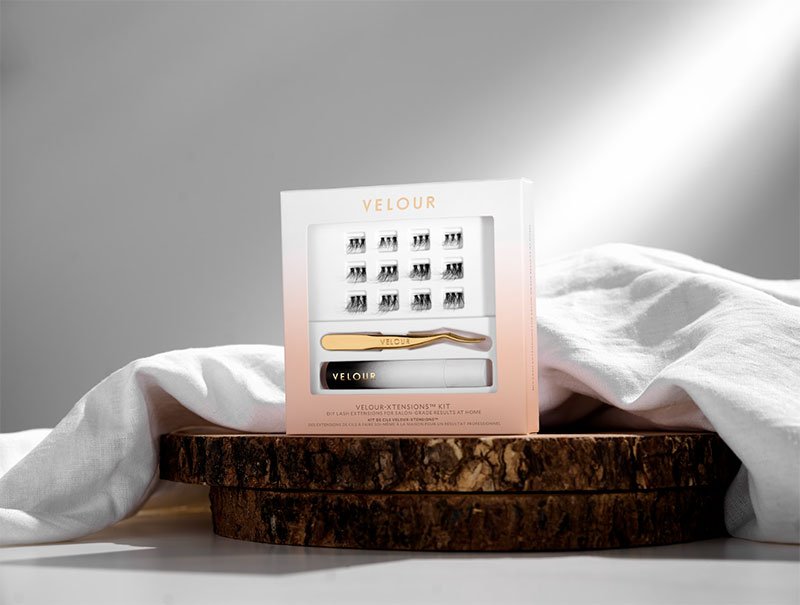
Which type of false lashes have been trending the most? Everyone is loving DIY lash extensions – they’re customizable lash clusters that are applied underneath your natural lashes for a lash extension look that can last several days. The Velour-Xtensions™ Kit has everything you need for this trend!
Types of False Lashes:
Strip lashes:

What types of strip lashes do you offer?
We offer three types of strip lashes - Effortless, Vegan Luxe, and Plant Fibre, as well as Magnetic lashes. Effortless lashes come on a 3 ⁄ 4 length band, meaning no measuring or trimming is required - they’re the best for beginners. We also have Magnetic Effortless Lashes, which offer the same benefits, but a different application - all you need is our magnetic Lash & Go Eyeliner and it just takes 2 steps!
Vegan Luxe and Plant Fibre come on a full band, but the difference between the two is the material - Plant Fibre lashes are made with hemp-derived fibres and Vegan Luxe uses premium vegan fibres! Both are super fluffy and lightweight.
The styles within all of our collections range from natural, to full, to glam volume, and the length of fibres also differs between each, so there’s truly something for all occasions.
Any tips for picking the best strip lash for your needs?
If you’re a first-time lash user, we’d definitely recommend our Effortless Lash collection or Magnetic Effortless Lash collection as they are the easiest to apply.
Otherwise, it’s all a matter of style preference! If you’re looking for a natural lash that you can wear everyday, we’d recommend choosing a lash with shorter fibres and natural volume - like Minimalist or Short & Sweet from the Effortless collection.
If you want a style that is more dramatic for a special occasion, choose something from our full-band Vegan Luxe collection, like Serendipity or Secret Weapon. These definitely draw more attention!
What tools does someone need to apply strip lashes?
For strip lashes, there are a few tools that will make application much easier. First, you need adhesive. Our White Latex-Free Lash Adhesive is our top-seller and fan favorite. Additionally, to achieve precise application of the lash, you’ll want a tool like our Too Easy Lash Applicator! And lastly, if you’re using a lash with a full-length band, you’ll need scissors to trim the band, like our Too Sharp Lash Scissors.
Pros and cons of strip lashes?
There are pros to each lash collection, it really depends on where you are in your lash journey! If you’re a beginner, go for Effortless - the pros are the easy application and natural look.
If you’re more lash-confident, try out Vegan Luxe or Plant Fibre - as they’re on a full-length lash band, you can customize the length to suit your eye shape. This is definitely a pro for some people, but could be a con if you’re new to lashes. A pro for all of our lashes is that they can be reused 20+ times!
On a scale of 1-3 (1 being the easiest and 3 being the most difficult) how easy are strip lashes for beginners to try and master?
It all depends on which strip lashes you’re using. For beginners, we recommend using a ¾ length band with a clear-drying adhesive for your first time. The Effortless Lash Kit has everything you need for your first beginner-friendly lash application, which would be an easy peasy 1 on the scale!
Magnetic Lashes:

What types of styles are available in your magnetic lashes and which one is the most popular?
We have a range of styles within our Magnetic Effortless Lash collection, which range from natural to full volume. Because these are applied with our black magnetic Lash & Go Eyeliner, they will look a bit more glam on the eyes due to the liner underneath the lash band. Our most popular style is Opposites Attract - it’s a sultry, winged style that creates a classic cat eye.
Any tips for picking the best magnetic lash for your needs/deciding if this lash type is right for you?
When you’re getting into magnetic lashes, you should look at the length of the lash band and the size of magnets. A ¾ length lash band will be the easiest to apply. For comfort, look for magnetic lashes that have small, rounded magnets.
A great way to test this type of lash for the first time is in a kit, like the Magnetic Effortless Kit, which includes a magnetic lash style and mini magnetic Lash & Go Eyeliner
As with strip lashes, when choosing a specific style, look at the length and volume of the fibres, as well as the shape. If you want to create a flared, cat-eye look, go for a flared lash style where the fibres are longest on the outer corner. If you prefer a more doll-like appearance, choose a round lash where the fibres are longest in the center.
What tools does someone need to apply magnetic lashes?
You’ll need the magnetic Lash & Go Eyeliner to apply magnetic lashes - and that’s it! As our magnetic lashes come on a ¾ length band, you won’t need to measure or trim them with scissors. And it’s best to apply them with your fingers as magnetic lashes can get stuck to a metal tool!
Pros and cons of magnetic lashes?
If you’re a liner lover and use liquid eyeliner everyday, magnetic lashes are for you! The pro here is that your lashes will just snap onto your dried liner so it’s such a quick and easy addition to your look! If you aren’t comfortable applying eyeliner or don’t like the look of it, then magnetic lashes might not be for you. If you prefer a natural look, we’d recommend using a strip lash with a clear lash adhesive.
On a scale of 1-3 (1 being the easiest and 3 being the most difficult) how easy are magnetic lashes for beginners to try and master?
If you’re a pro liner user, magnetic lashes would be a 1. If you aren’t confident using liner, then it could be a 2 or 3, but remember that practice makes perfect! Once you’ve got the liner down, the lashes are easy - they just snap right on!
DIY Lash Extensions:
What types of styles are available in your home lash extensions and which one is the most popular?
We have 3 different styles to choose from within our Velour-Xtensions™ collection - Classic, Hybrid and Volume. Classic is the most natural, Volume is the most glam and Hybrid is in between the two. Hybrid also happens to be our top-selling style, and also comes within our best-selling Velour-Xtensions™ Kit! There are 3 lash cluster lengths in each of these styles.
Any tips for picking the best lash extensions clusters for your needs?
If you’re new to DIY lash extensions, look for a dermatologist tested lash bond to ensure the formula is gentle. For lash extension clusters, look for a clear lash band and 3D lash fibres. This will result in a more natural and realistic look. Velour-Xtensions™ Lash Clusters use a patent-pending technique to create a wipsy natural look.
Within Velour-Xtensions™, the style you choose is all a matter of preference - if you want a natural option, go for Classic. It really just accentuates your natural lashes and blends in seamlessly. If you want something a bit more wipsy and fluffy, try Hybrid. And if you want the most glam option, go for Volume!
What tools does someone need to apply DIY lash extensions? You’ll need a lash bond, which is a longwear lash adhesive, and applicator, to apply and fuse the lash extension clusters to your natural lashes. Depending on the brand you choose, you may also need a sealant, which acts like a top coat.
The Velour Multi-Day Lash Bond and Too Real Lash Extension Tool are all you need for Velour-Xtensions™ DIY lash extensions - we developed it to be a simpler application process so you don’t need a sealant! The easiest way to try DIY lash extensions is with a kit, as you’ll get all the products you need to complete your look.
Pros and cons of DIY lash extensions?
A few pros of Velour-Xtensions™ DIY lash extensions are:
They’re completely customizable, so you can mix and match lengths to create your own lash look.
You can wear them for multiple days so they save you time, fuss and expense!
Our Multi-Day Lash Bond is a dermatologist tested, gentle formula.
You don’t need a sealant with Velour-Xtensions™ - our lash extensions are designed to be applied in just 3 steps: bond, apply and fuse!
On a scale of 1-3 (1 being the easiest and 3 being the most difficult) how easy are DIY lash extensions for beginners to try and master?
If you’re completely new to lashes and have never tried DIY lash extensions before, there will be a learning curve, but that’s the same with any type of lash.
There’s a QR code on all Velour-Xtensions™ that will take you to a step-by-step tutorial to make it even easier! Velour-Xtensions™ have really made a difference in the DIY lash space - making lash extensions accessible for anyone, even in the comfort of your own home!
We’ve simplified the number of steps you need in application, so for some, this can be as easy as 1.